Frontier Workshop
Frontier is a set of modules to build an Ethereum-compatible blockchain with Substrate.
Getting Started
You should have completed at least the following three Substrate tutorials before attempting this tutorial:
Before attempting this tutorial, you should be familiar with the concepts listed below:
- Launching a Substrate chain
- Submitting extrinsics
- Adding, Removing, and configuring pallets in a runtime
- Ethereum and EVM basics
- Pallet design
Frontier Template
This tutorial is presently a little bit out of date. While it is still a good reference, it refers to an older version of Substrate template. It is thus encouraged to generate your own template based of whatever commit you desire from frontier itself to start working with many of the core features of Frontier installed and enabled.
The Frontier project currently does not use the published Substrate
crates; it refers to Subsrate code from github directly. Take note of this in your Cargo files. You must
use the matching version of dependencies for all of Substrate and Frontier in your project.
This is a stop-gap solution while Frontier is being updated to the latest Substrate tag/release.
There's also a github repo template that is available for major Frontier releases pre-generated for you.
Generation Script
You can generate a version of the Frontier template by running the generation script included in Frontier.
# from the top working dir of Frontier:
cd .maintain/
# set the *full file name with .tar.gz extension* for your output file
./node-template-release.sh TEMPLATE.tar.gz
# Note the file will be placed in the top level working dir of frontier
# Move the archive to wherever you like...
tar xvzf TEMPLATE.tar.gz
# this unpacks into `frontier-node-template` with all your files
cd frontier-node-template
The Substrate Developer Hub has generated the template using the included release guide , and intends to update with major releases of Frontier moving forward.
You can use the pre-generated template or fork it from here:
https://github.com/substrate-developer-hub/frontier-node-template/ .
Build & Config Setup
Genesis Configuration
The development chain spec included with this project defines a genesis
block that has been pre-configured with an EVM account for
Alice. When
a development chain is started,
Alice's EVM account will be funded with a large amount of Ether. The
Polkadot UI can be used to see the details
of Alice's EVM account. In order to view an EVM account, use the Developer tab of the Polkadot UI
Settings app to define the EVM Account type as below. It is also necessary to define the
Address and LookupSource to send transaction, and Transaction and Signature to be able to
inspect blocks:
{
  "Address": "MultiAddress",
  "LookupSource": "MultiAddress",
  "Account": {
    "nonce": "U256",
    "balance": "U256"
  },
  "Transaction": {
    "nonce": "U256",
    "action": "String",
    "gas_price": "u64",
    "gas_limit": "u64",
    "value": "U256",
    "input": "Vec<u8>",
    "signature": "Signature"
  },
  "Signature": {
    "v": "u64",
    "r": "H256",
    "s": "H256"
  }
}
Build & Run
To build the chain, execute the following commands from the project root:
cargo build --release
To execute the chain, run:
./target/release/frontier-template-node --dev
The node also supports to use manual seal (to produce block manually through RPC).
./target/release/frontier-template-node --dev --manual-seal
Query Balance Using RPC
Once your node is running, use the Polkadot JS Apps' RPC calls under the Developer tab to query eth > getBalance(address, number) with Alice's
EVM account ID (0xd43593c715fdd31c61141abd04a99fd6822c8558); the value that is returned should be:
x: eth.getBalance
340,282,366,920,938,463,463,374,607,431,768,211,455
Further reading: EVM accounts
Alice's EVM account ID was calculated using an included utility script.
Deploy & Call Ethereum Smart Contracts
To deploy and call Ethereum smart contracts and test the related functionality follow the next steps at:
Architecture
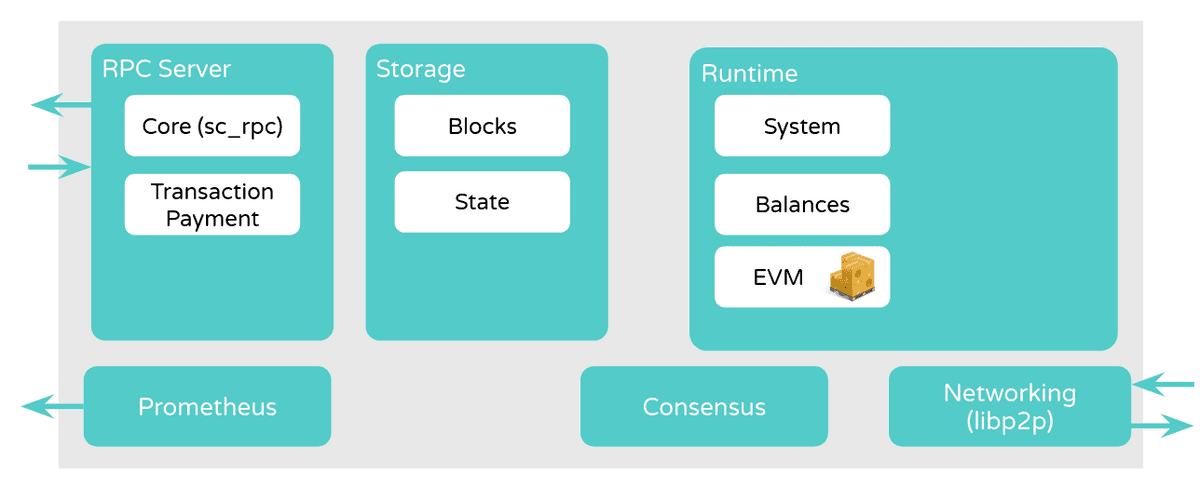
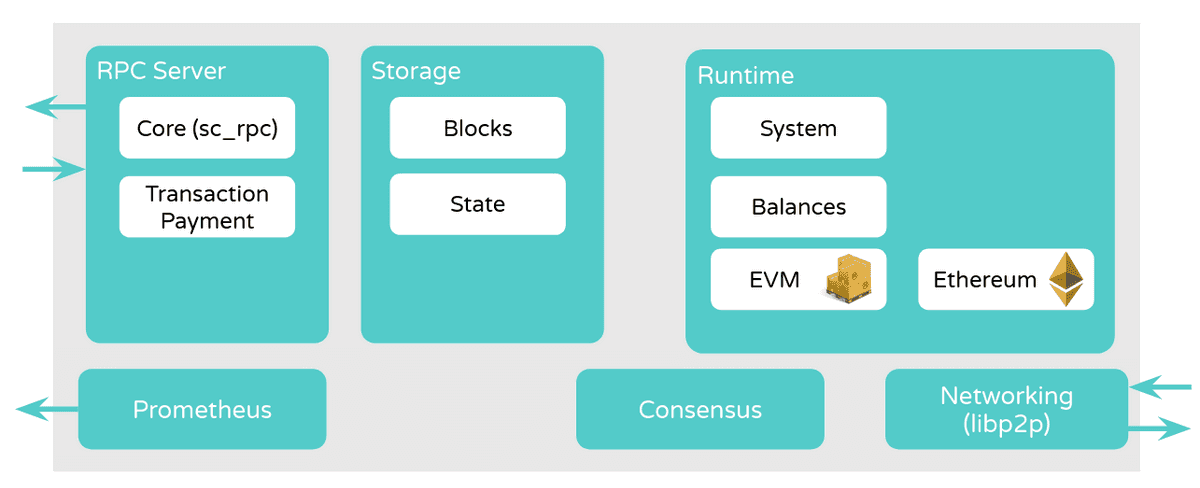
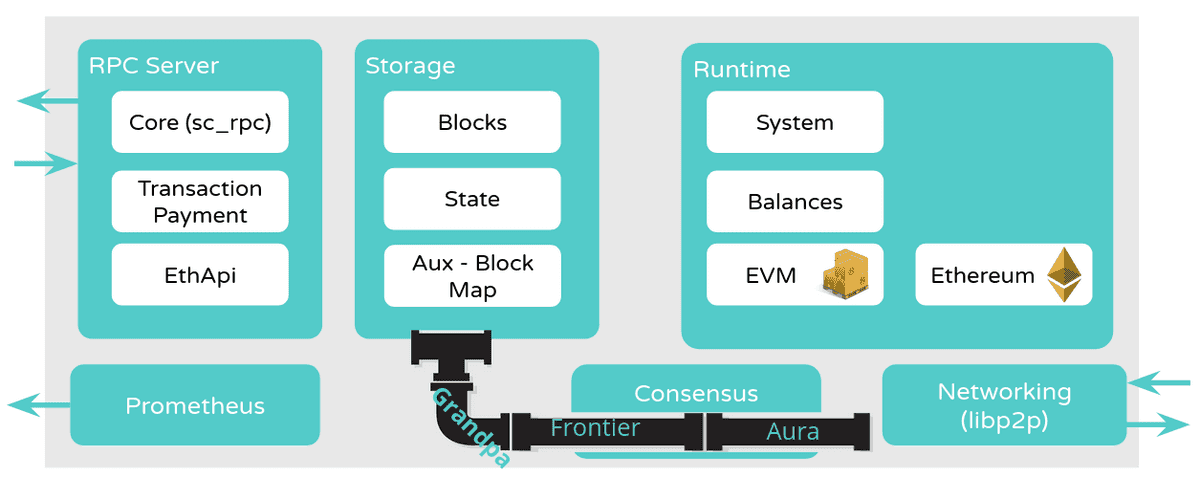
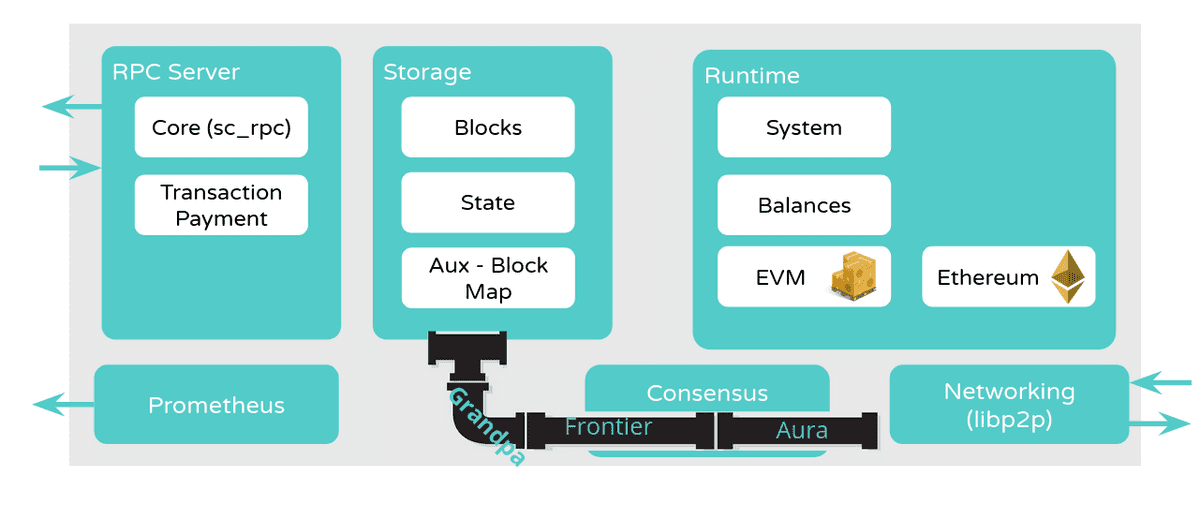
Here are a few helpful diagrams to help illustrate how the Frontier EVM and Ethereum RPC plug into your Substrate FRAME runtime.
EVM Pallet Runtime Configuration
The Ethereum Virtual Machine (EVM) is a sandboxed virtual stack machine that is implemented in the EVM pallet. The EVM is responsible for executing Ethereum contract bytecode of smart contracts, typically written in a high level language like Solidity, then compiled to EVM bytecode.

Ethereum Pallet
The Ethereum pallet is responsible for storing Ethereum-formatted blocks, transaction receipts, and transaction statuses.

Wrapping Ethereum Transactions
When a user submits a raw Ethereum transaction, we need to convert it into a Substrate transaction. The conversion is simple. We just wrap the raw transaction in a call the pallet_ethereum's transact extrinsic. This is done in the runtime.
Note that Ethereum Accounts and Substrate accounts in this template are not directly compatible for using keys. For an explainer on this, please see the Moonbean documentain on EVM&Substrate Accounts
Ethereum Specific Runtime APIs & RPCs
Our runtime is storing all the ethereum-formatted information that may be queried, thus we need a way for the RPC server to call into the runtime and retrieve that information. This is done through runtime APIs & RPCs.

Further reading:
- Runtime APIs
- Recipe about Custom RPCs
- RPCs in Frontier: fc-rpc and fc-rpc-core
Frontier Block Import

Further reading:
ERC20 Contract Deployment
The following steps are also available as a Typescript script using Polkadot JS SDK.
Contract creation
The truffle directory contains a
Truffle project that defines
an ERC-20 token. For convenience, this
repository also contains
the compiled bytecode of this token contract,
which can be used to deploy it to the Substrate blockchain.
Further reading: the ERC-20 token standard
Use the Polkadot UI Extrinsics app to deploy the contract from Alice's account (submit the
extrinsic as a signed transaction) using evm > create with the following parameters:
source: 0xd43593c715fdd31c61141abd04a99fd6822c8558
init: <raw contract bytecode, a very long hex value>
value: 0
gas_limit: 4294967295
gas_price: 1
nonce: <empty> {None}
The values for gas_limit and gas_price were chosen for convenience and have little inherent or
special meaning. Note that None for the nonce will increment the known nonce for the source
account, starting from 0x0, you may manually set this but will get an "evm.InvalidNonce" error if
not set correctly.
Once the extrinsic is in a block, navigate to the Network -> Explorer tab in the UI, or open up
the browser console to see that the EVM pallet has fired a Created event with an address field
that provides the address of the newly-created contract:
# console:
... {"phase":{"applyExtrinsic":2},"event":{"index":"0x0901","data":["0x8a50db1e0f9452cfd91be8dc004ceb11cb08832f"]} ...

# UI:
evm.Created
A contract has been created at given [address]
   H160: 0x8a50db1e0f9452cfd91be8dc004ceb11cb08832f
In this case, however, it is trivial to
calculate this value:
0x8a50db1e0f9452cfd91be8dc004ceb11cb08832f. That is because EVM contract account IDs are
determined solely by the ID and nonce of the contract creator's account and, in this case, both of
those values are well-known (0xd43593c715fdd31c61141abd04a99fd6822c8558 and 0x0, respectively).
Check Contract Storage
Use the Chain State UI tab to queryevm > accountCodes for both Alice's and the contract's
account IDs; notice that Alice's account code is empty and the contract's is equal to the bytecode
of the Solidity contract.
The ERC-20 contract that was deployed inherits from
the OpenZeppelin ERC-20 implementation
and extends its capabilities by adding
a constructor that mints a maximum amount of tokens to the contract creator.
Use the Chain State app to query evm > accountStorage and view the value associated with Alice's
account in the _balances map of the ERC-20 contract; use the ERC-20 contract address
(0x8a50db1e0f9452cfd91be8dc004ceb11cb08832f) as the first parameter and the storage slot to read
as the second parameter (0x045c0350b9cf0df39c4b40400c965118df2dca5ce0fbcf0de4aafc099aea4a14). The
value that is returned should be
0xffffffffffffffffffffffffffffffffffffffffffffffffffffffffffffffff.
The storage slot was calculated using
a provided utility. (Slot 0 and alice address:
0xd43593c715fdd31c61141abd04a99fd6822c8558)
Further reading: EVM layout of state variables in storage
Contract Usage
Use the Developer -> Extrinsics tab to invoke the transfer(address, uint256) function on the
ERC-20 contract with evm > call and transfer some of the ERC-20 tokens from Alice to Bob.
target: 0x8a50db1e0f9452cfd91be8dc004ceb11cb08832f
source: 0xd43593c715fdd31c61141abd04a99fd6822c8558
input: 0xa9059cbb0000000000000000000000008eaf04151687736326c9fea17e25fc528761369300000000000000000000000000000000000000000000000000000000000000dd
value: 0
gas_limit: 4294967295
gas_price: 1
The value of the input parameter is an EVM ABI-encoded function call that was calculated using
the Remix web IDE; it consists of a function selector (0xa9059cbb)
and the arguments to be used for the function invocation. In this case, the arguments correspond to
Bob's EVM account ID (0x8eaf04151687736326c9fea17e25fc5287613693) and the number of tokens to be
transferred (0xdd, or 221 in hex).
Further reading: the EVM ABI specification
Check Bob Contract Storage
After the extrinsic has finalized, use the Chain State app to query evm > accountStorage to see
the ERC-20 balances for both Alice and Bob.